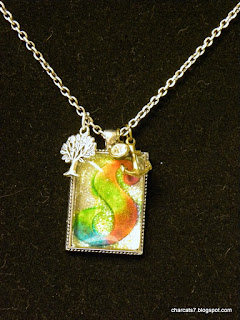
One of the great things about Close to My Heart is the variety of crafting, how many beautiful things you can make and how quick it is to make them- depending on what all you want as the result. I made 3 necklaces & 3 unique gift boxes in a matter of a few hours:
A friend asked me to make her & her 2 employees a monogrammed necklace. She gave me the tree charm as a connecting item between them. Plus the necklace for her has to be extra blingy as she's that kinda girl.
I cut each initial using white daisy card stock in my Cricut and the Artbooking cartridge, sizing the letters to fit in a 1" x 1.2" rectangle (the Base & Bling rectangle base). I then used some reinker (Lagoon, Sunset, Gypsy & Pear) just a couple drops with a drop of rubbing alcohol each on my All Purpose Mat (each color in it's own spot). Then I touched each letter into the different colors- a little here, a little there, and then let them dry. I then pressed the top of the letter into some VersaMark ink & added some clear embossing powder w/a little bit of glitter so that the letters would be shimmery and then heat set it.
Next I used the Base & Bling rectangle bases with some adhesive and a cut to size piece of silver glitter paper. Finally I placed the initial on top of the glitter paper and added a couple fat lines of Liquid Glass & the rectangle glass cover. Squeezing the glass cover down so that the Liquid Glass completely fills the entire base and makes a clear seal to the base. I used a baby wipe to remove any Liquid Glass that oozed out the edges- just a quick wipe along each edge to remove the excess (careful, over wiping actually wicks out the glue).
Then set aside to dry. In about 30minutes to an hour it's usually completely set to work with and put on a necklace.
NOTE: I learned the hard way that the glue will pull out the ink colors I added. To prevent this- adding some clear embossing powder & heat setting the back of the letters as well should prevent that color bleed.
I'll talk about the gift boxes in my next post.
- Char
I'm a Close to My Heart independent consultant & this is my blog to share things I create.
Monday, December 14, 2015
Thursday, November 19, 2015
Wreath Card
Ever want to make a simple & quick card that can transition to almost any season or reason? The wreath is definitely a way to give you that base & depending on the colors & sentiment you choose. Here's one I completed in 15 minutes:
I used a cup to give me a very rustic set of pale circles in the background using Cashmere ink (Z2175). You don't have to have a stamp for that- you just want a shape of the circle to guide the placement of what you add next. Freehand it if you like & feel comfortable with that.
Next I stamped 3 different leaves (from C1589, Lifetime of Happiness) in 3 shades of green, Fern (Z2650), Topiary (Z2155) & New England Ivy (Z2135). I chose the owl from an older stamp set- but you can use anything at this point to give a focal point- or not at all. I embossed the sentiment to help it pop using black ink pigment ink from our Basics Mini Pigment Pad Set (Z2503) & Ranger clear embossing powder (Z2088).
To add a finishing touch- I stamped a few of the leaves on the inside of the card as well as on the envelope
It carries the theme inside and also still leaves plenty of room for you to write a message.
Click here to go right to all our inks
Thanks for stopping by. Have fun creating & have a blessed day.
-Char
Sunday, August 16, 2015
Monday, July 13, 2015
Loss
Many in the crafting field know who Heidi Swapp is & has probably already heard of the loss of her son. If you know who Heidi is- you know she is warm, loving, joyful and so much more. I cannot imagine losing a child- her 16-yr old son.
If you are so led- please join in and send a card per the instructions in this link for Heidi & her family
http://beckyhiggins.com/share-your-love-for-the-swapp-family/
Thanks so much
If you are so led- please join in and send a card per the instructions in this link for Heidi & her family
http://beckyhiggins.com/share-your-love-for-the-swapp-family/
Thanks so much
Subscribe to:
Posts (Atom)


